Ever deleted an article by mistake in your knowledge base and felt silly? You obviously have two options for this. One, work on the article right from scratch again, so that you can replace it with the deleted article. Two, retrieve the deleted articles from the recycle bin. Of course, you must have decided on the second option, Recycle Bin which is a boon when articles are accidentally deleted. In such cases, a feature like Recycle Bin is very essential to retrieve the deleted information or articles.
Why do you need a feature like Recycle Bin?
- Acquire data: If you want to acquire any old data that is deleted, you can check the recycle bin to acquire it
- Retrieve deleted articles: Any articles that are mistakenly deleted can be retrieved from recycle bin
- Permanently delete articles: If you want to delete an article permanently for any reason, you can go to recycle bin and delete them permanently
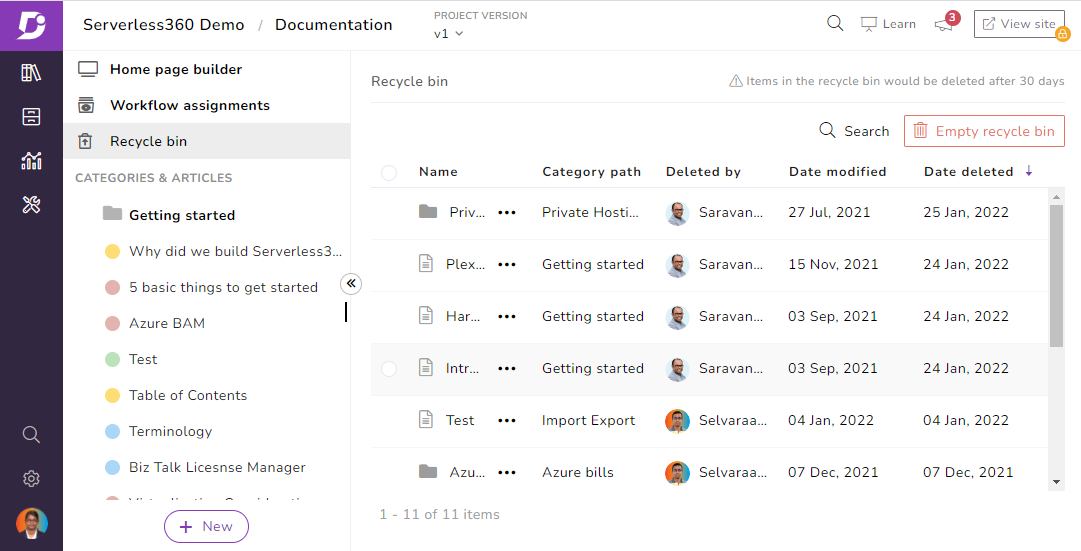
Document360 offers Recycle bin feature to help retrieve any articles or categories that are accidentally deleted. You can find the recycle bin option in the documentation menu. All the deleted files and articles in the knowledge base will be listed there. So, any deleted article or category in the knowledge base will be soft-deleted and moved to the recycle bin. When you click the recycle menu, you could see the grid which can hold up to 50 deleted articles or categories on each page. The recycle bin grid looks like the one below:

The recycle bin grid is presented in a way where it shows the name of the article in the first column, followed by the category path that mentions the category name in which the article was there. It mentions the username who deleted the article in the next column, along with the date modified and the date deleted in the next columns.
Search: With this search option inside the recycle bin grid, you can find the deleted articles by just typing the keywords in the search bar. This will easily result in the listings of the articles that are related to that particular keyword you searched for, using the search bar.
Filter by Author: If you want to identify the deleted article by filtering with the author’s name, you can select the author menu next to the search bar and check the box next to the author you wanted to search for. This will give the result by listing down all the articles written by that particular author.
Filter by entity level: This filter is applied based on the entity level with articles or categories. If you want to search only articles, you can select articles under the entity and perform the search. The same goes for category as well. This will help you to filter easily and identify or find the exact article or category that you are looking for.
Any deleted article or category will be available for a period of 30 days. After 30 days of any article or category being deleted, the Recycle bin will permanently delete the articles and categories.
Dependencies of the article:
In your deleted article, when you use pictures, private notes, variables, or snippets, automatically there creates a dependency with this deleted article. Now, you must be wondering what happens to these images, or snippets if used any, when the article is deleted?
You can see the images in the drive; you can find the snippets and variables in the content reuse menu. But you can find a tag named ‘moved to recycle bin’ attached to the images, or any snippets used in the article as there is a dependency.
Search in Drive: When you search the deleted article in the Drive, it shows a result ‘moved to recycle bin’
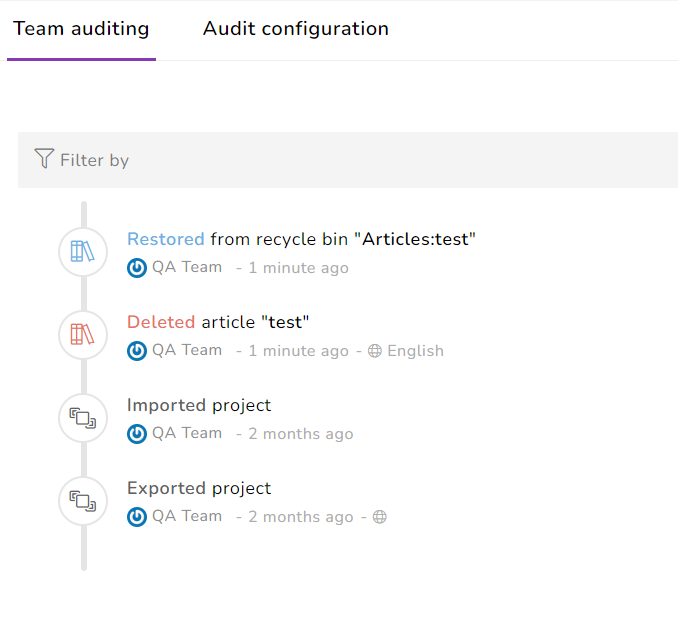
Audit log: You can also find the history of the article that is deleted or restored when you check the team auditing section. This helps with complying with company policies or any laws/regulations governing the content. This audit trail also helps to find root cause of any security breaches leading to deletion of any article.

Restoring any deleted article
Restoring any deleted article is possible with the Recycle Bin and that is the major reason for creating this feature. Once you delete, or mistakenly delete an article, you can search and identify the article in the recycle bin. After finding the exact article you want to restore, you can find three dots next to the article name. By clicking the three dots, you will see three options namely view, delete forever and restore.
View: When you click this option, you can just view the article which you deleted
Delete forever: Maybe you don’t want this article at all; in such cases, you can select this option to delete forever instead of waiting for 30 days for it to delete forever.
Restore: This the option where you can restore any deleted file. Once you click this option, you will see a dialog box asking, ‘Are you sure you want to restore the selected articles?’ and you can select yes to restore the file. With this, the deleted article will be restored in its original folder.
Restoring deleted folder
If you want to restore the entire folder that is deleted which has a couple or more articles inside the folder, it is slightly a different process. Like the process mentioned above, you can click the three dots and then select the View option. All the articles under the particular folder will be listed along with the checkbox. You can check the articles that you want to restore. On top of the list of articles, you will find two options; one is delete forever and the other is restore.
You can select restore, to restore the articles and vice versa.
Final words
At times, mistakes happen like deleting an article that you really don’t want to delete. With Recycle Bin you can recover articles that are deleted accidentally. You can also purge articles from recycle bin if you choose to delete them permanently for any compliance reasons. This feature is available only for the business tier and if you wanted to upgrade, take this opportunity to do so. If you’re new to the world of knowledge base and wanted to explore the features for free, sign-up for the free trial now!


 –
– 

